The post How to Create a Watercolor Effect in Photoshop (Step-By-Step Guide) appeared first on Digital Photography School. It was authored by Ana Mireles.
Did you know that you can apply a watercolor effect in Photoshop to any image?
That’s right. You can make any photo look like it was painstakingly painted by hand, which comes in handy if you’re looking to create an abstract effect, or you’re hoping to liven up an otherwise bland image.
In this article, I’ll explain how it works (in simple language that even a Photoshop beginner can understand). I’ll also show you how to use a Photoshop action to create the effect, so you can do it with just a few quick clicks.
Ready to make your photos look like watercolors? Let’s get to it!
What is a Photoshop watercolor effect?
Most of us have done a watercolor painting at some point in our lives. Watercolors are often used by children because, unlike other types of paints, they’re not at risk of being drunk. (Why? Because they’re blocks of pigments bound together by a water-soluble ingredient. This means that the paints are solid – until you rub a wet brush on the pigment block.)
Now, unlike actual watercolor painting, the watercolor effect is done in Photoshop. It’s a post-processing technique that lets you make your photographs look like they were created using watercolor paints.
Not only is it safe, but it’s also easier than painting, and it’s very flexible. You can take full control over the results by proceeding through the steps I share below, or you can use an action, which is basically a preset that lets you automate the process.
When is it useful to create a watercolor effect?
This is an easy question to answer. You should create a watercolor effect whenever you want!
You see, making your photograph look like watercolor paint is a personal choice. Maybe you like watercolors but you don’t know how to paint. Perhaps you simply feel like experimenting with different techniques. Or maybe you just want to create a cool, painterly effect.
In summary, you don’t do the watercolor effect in Photoshop because it’ll help you achieve some other result down the line. You do it because you like how it looks!
How to create a watercolor effect in Photoshop: step by step
There are many ways to create a watercolor effect in Photoshop. For instance, you could go to the Filter Gallery inside Photoshop and choose the Watercolor option.
That’s an easy and quick solution. However, if you want your watercolor effect to look its absolute best, you should probably invest a little more time. The process I explain below is the one I like most. It gives great results, and it’s easy to follow and customize.
Before you start

Before you can create a watercolor effect, you’ll need to download watercolor brushes. For this tutorial, I’ve used the brushes offered by Adobe since they’re included in your Photoshop subscription and they’re easy to use.
To download the relevant brush, activate the Brush tool. Then click on the hamburger menu icon – on the Brush panel – to open the menu. Go ahead and select Get More Brushes…
This will launch the Adobe brushes websites. Click Download on the Watercolor package and save it on your computer. Then go back to Photoshop, open the Brushes panel menu again, and choose Import Brushes.
Then select the file you just downloaded and click OK.
You’ll also need a paper overlay to give your piece that authentic watercolor look. You can download one from many online websites. However, I found it easier to photograph a piece of watercolor paper and use that. Whatever approach you use, have this file ready when you decide to make your Photoshop watercolor effect.
Step 1: Open your photo and duplicate the layer
Start by bringing your photo into Photoshop, then duplicate the layer. This isn’t a step that changes the outcome of the watercolor effect, but I always like to do this so that I have an original version to revert back to if anything goes wrong.
You can do this by tapping Ctrl/Cmd + J. Then, because you’ll be working on the duplicate, turn off the background layer by clicking on the eye icon.
You can duplicate your layer – or revert back to the original layer – at any time. You can also turn the background layer on whenever you want. It won’t affect your work.
Step 2: Convert the layer to a Smart Object

Go ahead and convert the layer into a Smart Object; that way, all the filters you apply to that layer will become Smart Filters, and you can adjust them anytime you like (even once the filter effect has been applied).
To do this, just right-click on the layer and select Convert to Smart Object. Alternatively, you can select Filter in the main menu, then choose Convert for Smart Filters.
Step 3: Add the Dry Brush filter
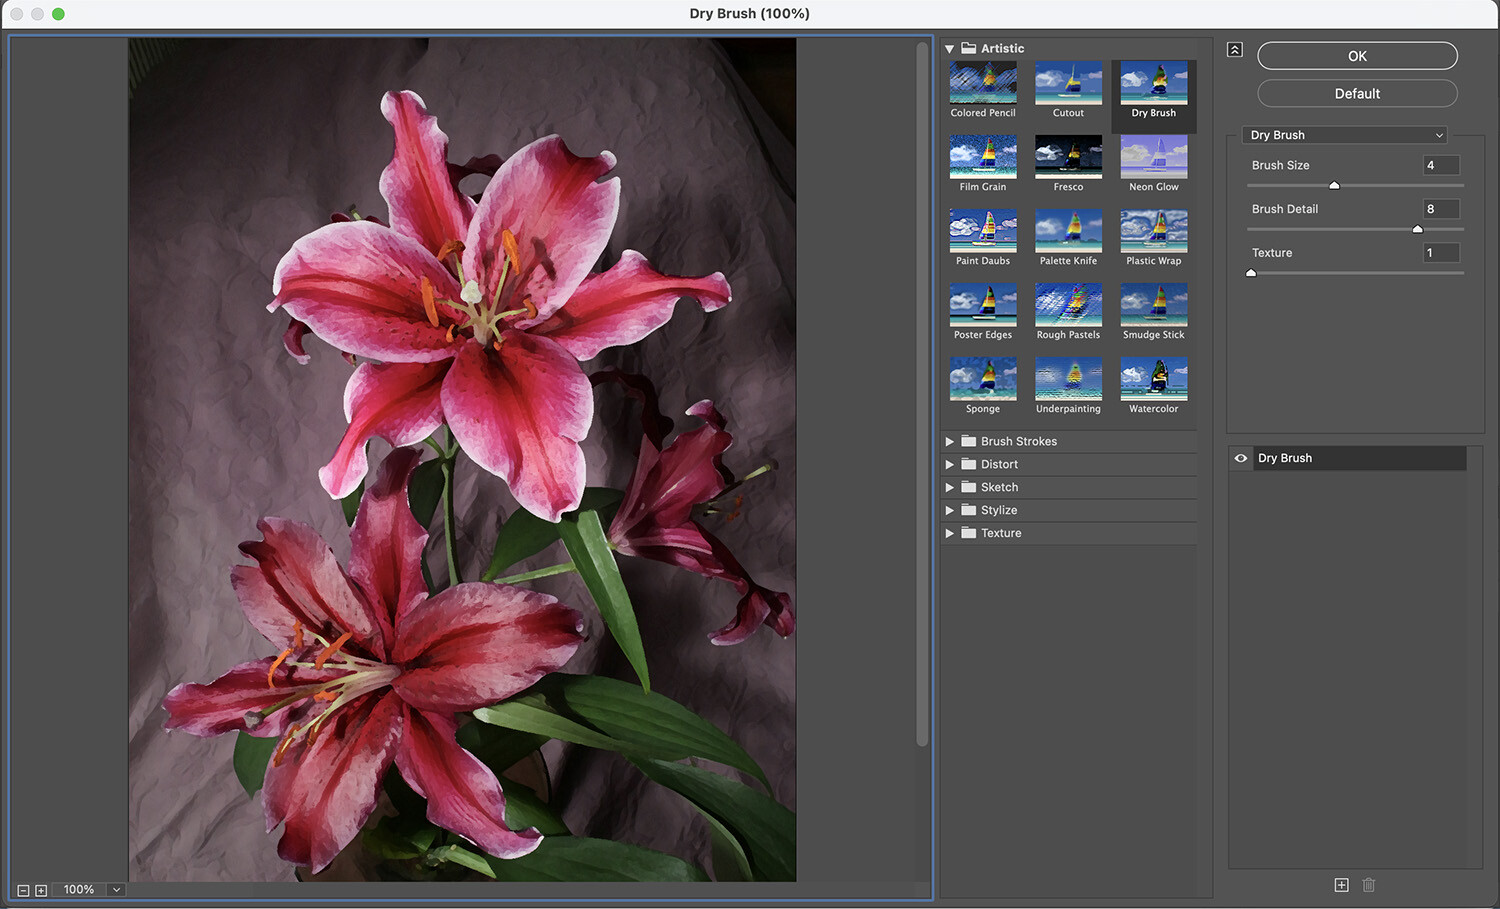
As I mentioned earlier in this article, you can technically create a watercolor effect by choosing Filters>Filter Gallery>Artistic>Watercolor. But the result won’t look top-notch; instead, I’d recommend using a series of filters, starting with Dry Brush.
So in the menu, select Filters>Filter Gallery>Artistic>Dry Brush. Then move the slider until you like the result. Click OK.
Remember that, because you turned the layer into a Smart Object, you can always go back to adjust the sliders later on. So if you’re not sure you like the look you created, don’t worry!
Step 4: Add (and adjust) the Cutout filter
The next filter you need to apply is called Cutout. To do this, you’ll need to go back to the Filter Gallery, so select Filters>Filter Gallery. Be careful not to click on the first Filter Gallery on the menu:
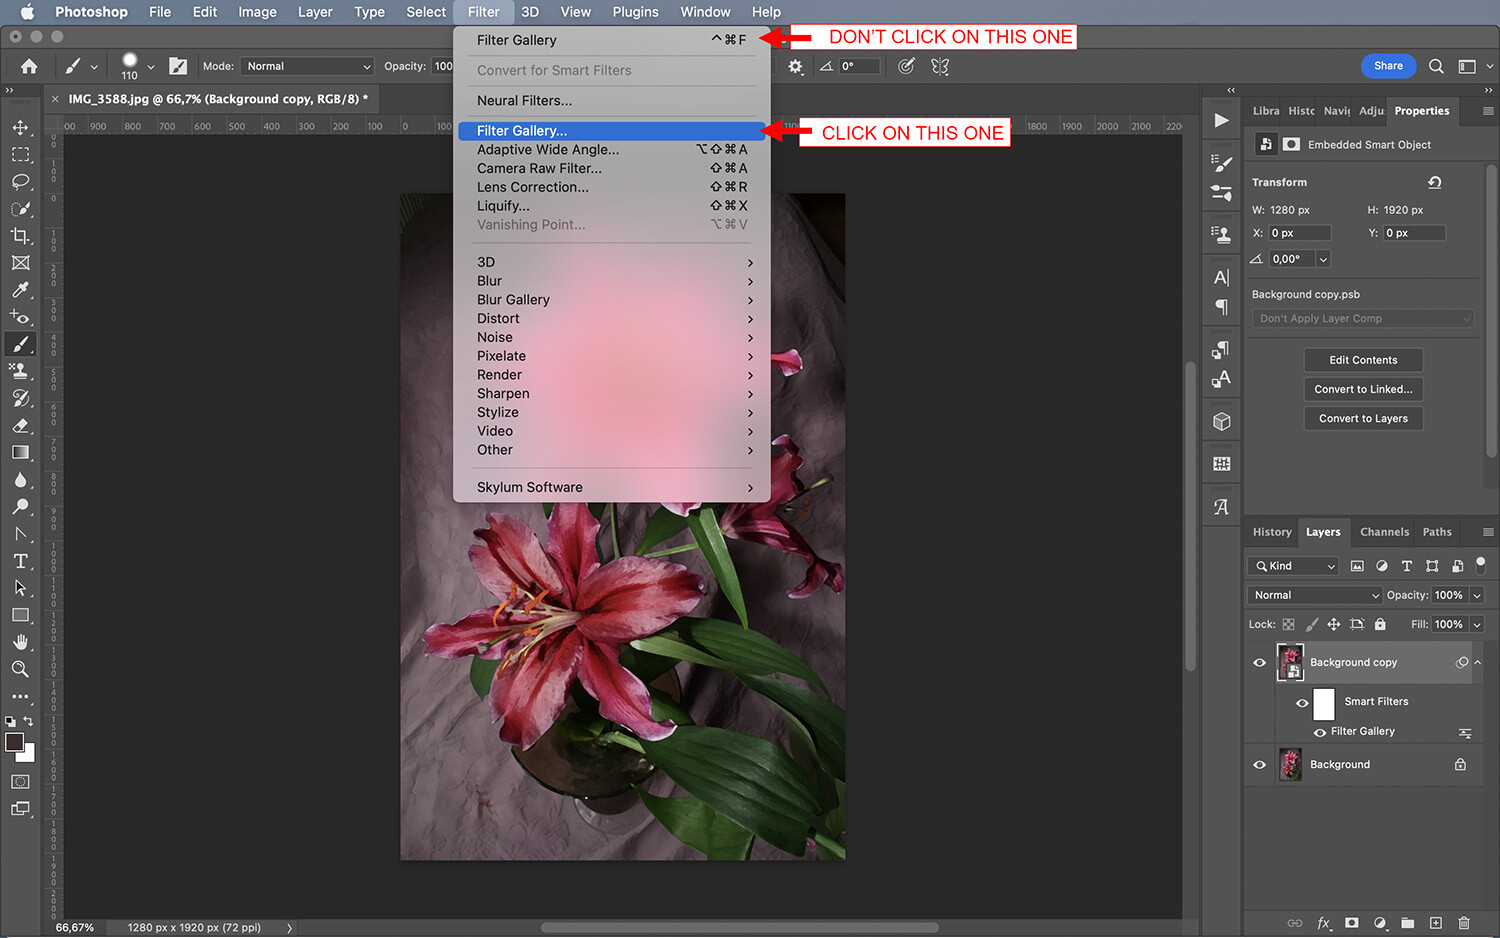
Now, go to Artistic>Cutout:
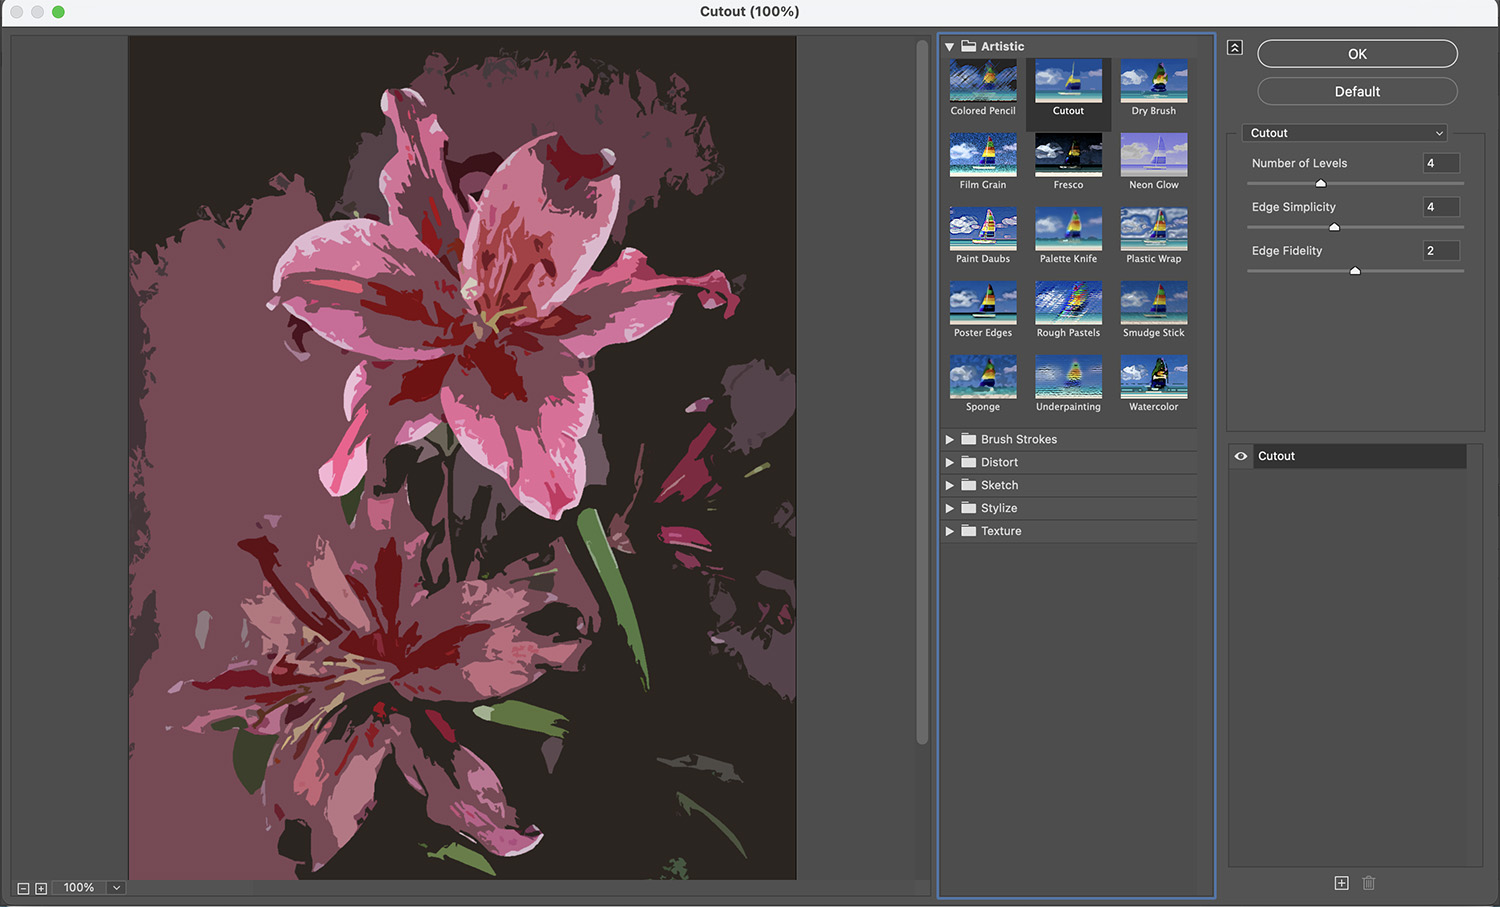
Don’t worry if your image looks weird – you’ll need to change the blend mode to get the effect we’re after. So click OK.
Now go to the Layers panel and click on the icon on the right side of the second Filter Gallery effect:
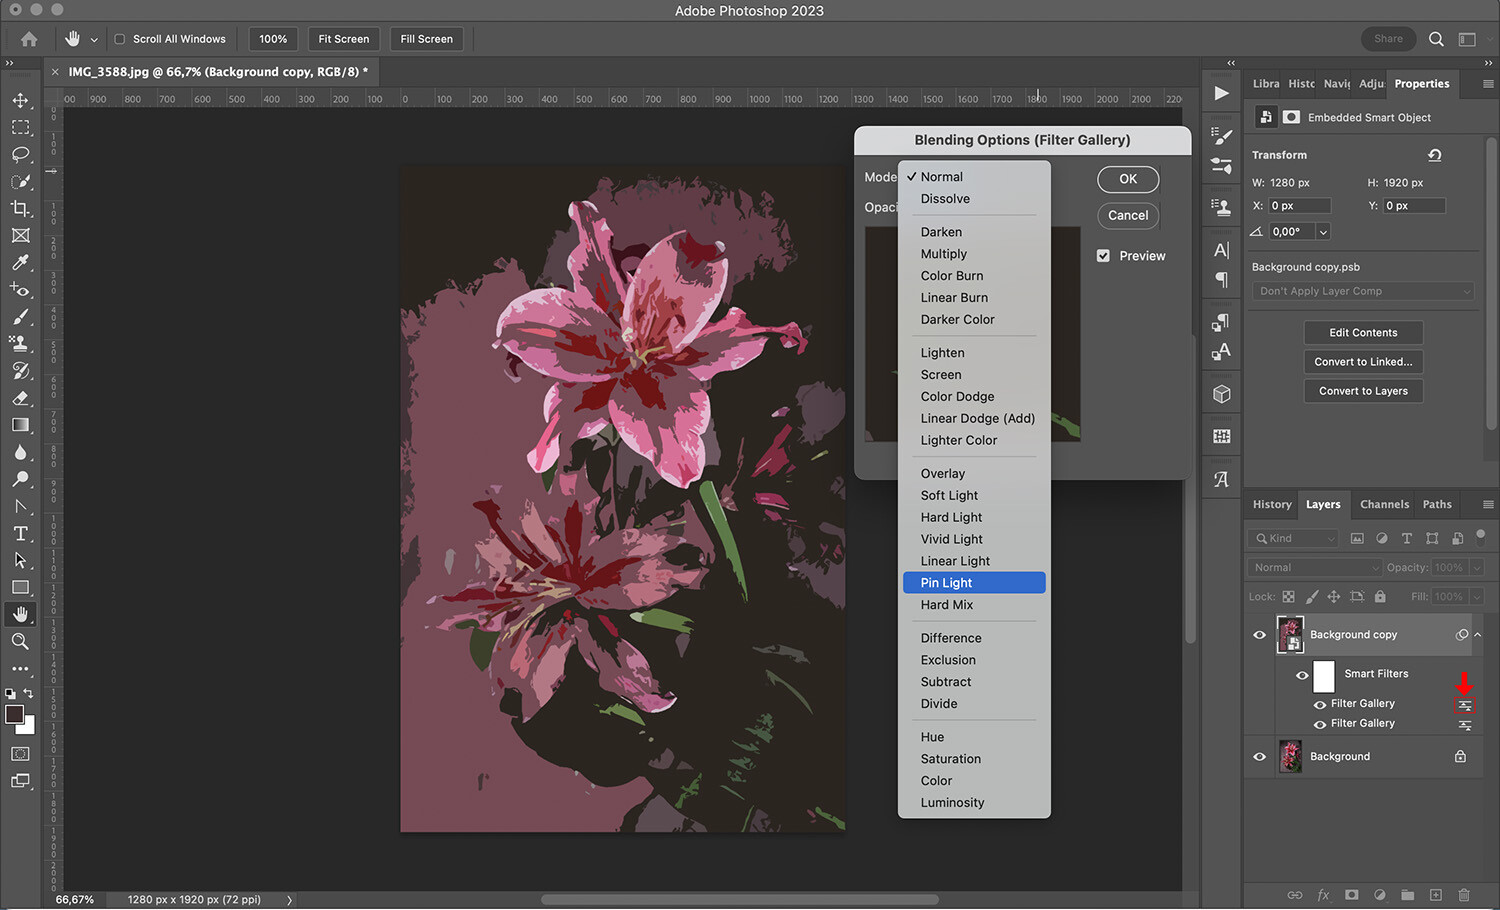
This will open the Blending Options window; use the Mode dropdown menu to select Pin Light.
Now you can double-click the Filter Gallery layer to customize the filter if you want. Unfortunately, you can only see the filter effect without the blend mode in the Filter Gallery window, so adjusting the effect may take some trial and error.
Step 5: Blur the image

Next, you’ll need to create a blur effect. This won’t be found in the Filter gallery; instead, simply go to Filter>Blur>Smart Blur. Adjust the settings in the dialog box, and when you’re satisfied, click OK to apply.
Now change the blending mode to Screen. You’ll be able to open the relevant dialog box just like you did the last time: by clicking the icon next to the filter. Lower the opacity to whatever looks best.
Step 6: Apply the Fine Edge filter

The final filter is called Find Edges, which will mimic pencil traces that show through the watercolor. To apply it, go to Filter>Stylize>Find Edges.
Change the blend mode to Multiply and adjust the opacity to your liking.
Step 7: Add a paper texture

Now you’ll need to add a paper texture to make your watercolor effect more realistic. This is where the photo of the paper comes in handy.
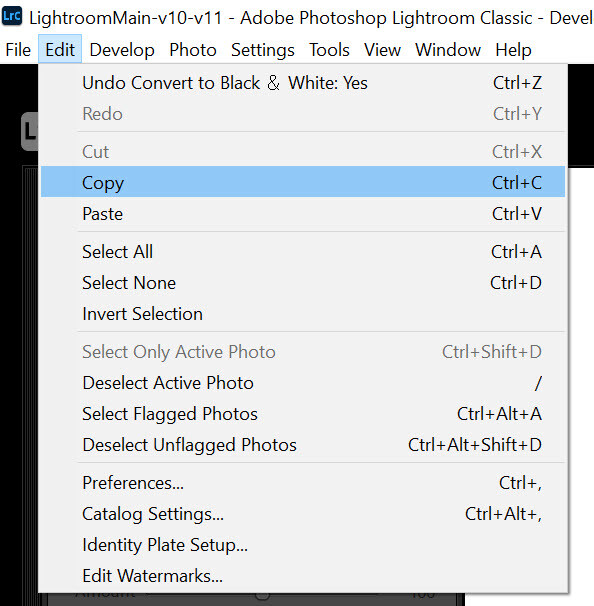
You can add your paper overlay by choosing File>Place>Embedded. Alternatively, you can open the paper on a different tab and select Ctrl/Cmd + C and Ctrl/Cmd + V to copy and paste it into the relevant workspace.
Whichever technique you used, the paper photo should now appear as the top layer of your watercolor image. Be sure to adjust the size of the canvas so that the paper covers the entire image.
Go ahead and change the blend mode to Multiply using the dropdown menu in the Layers panel.
Step 8: Paint on the image

Go back to the layer with your watercolor image. Add a black layer mask (you can do this by clicking on the Add Layer Mask button at the bottom of the layer panel, then hit Ctrl/Cmd + I on your keyboard to fill the mask with black).
At this point, you’ll only see the paper. That’s because the black layer mask is hiding the image. You need to make it visible using white brushstrokes; by doing this right, the image will look painted on the paper.
So grab the Brush tool from the toolbox or enable it by hitting the B key on the keyboard. Go to the Options bar and choose one of the Watercolor brushes you downloaded at the beginning of this tutorial.
Start painting on the layer mask to reveal the image. Make sure you change the brush size often (you can also change the brush tip after a while). This will make the watercolor effect in Photoshop look more real (plus, it’ll look different every time!).
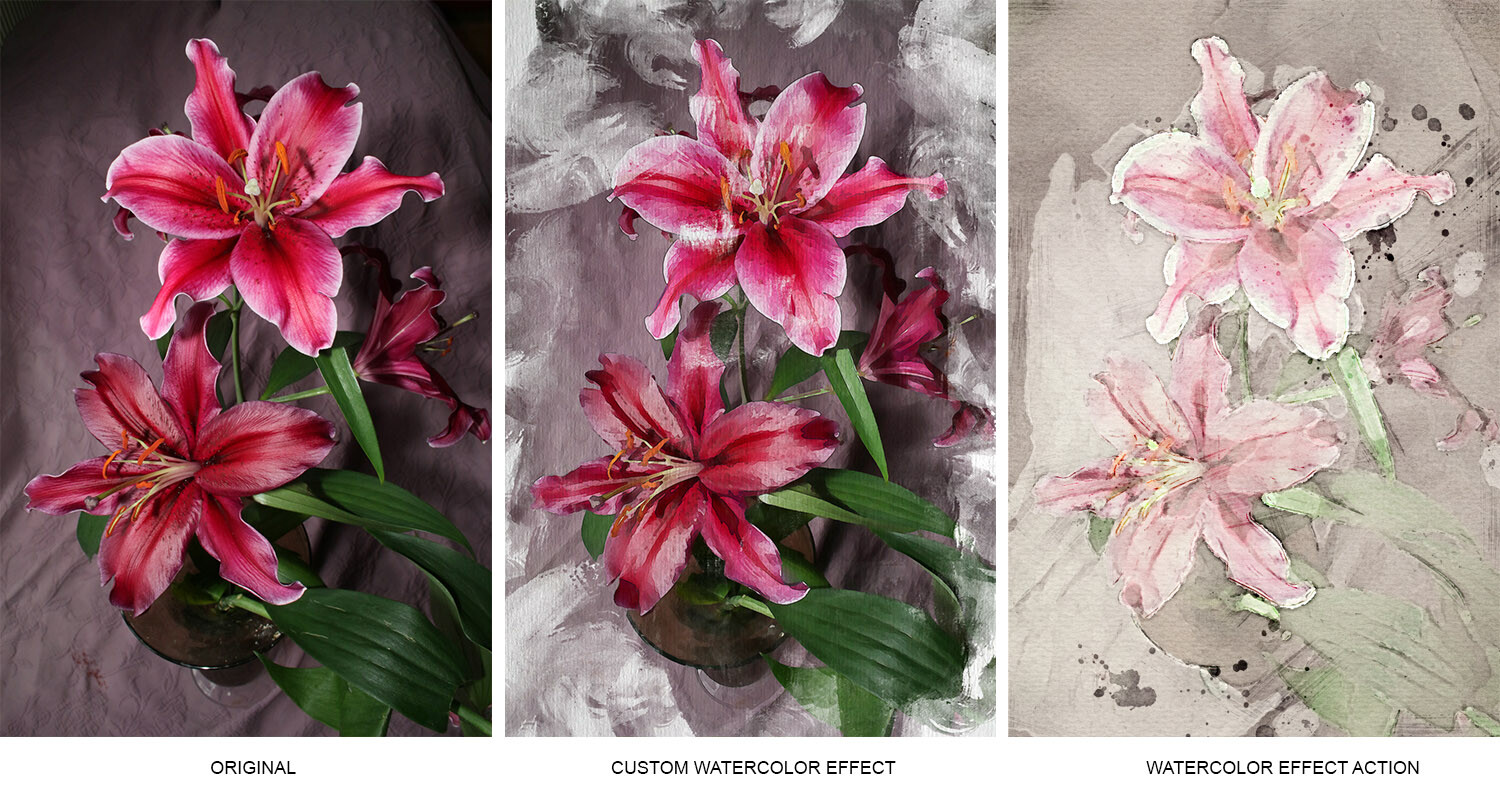
How to create a watercolor effect using Photoshop actions
As I explained above, an action is a way to automate a Photoshop process, very much like a preset. There are already many Watercolor Effect actions available for Photoshop, and they’re very easy to use. Simply download them, import them into Photoshop, and run the action.
Of course, you won’t get much control over the final result. That’s the trade-off; sure, you save time, but you lose customizability.
That said, some Photoshop actions do let you customize the effect slightly. It depends on the action. (And if you like the watercolor effect an action creates, you might not want to customize it!)
In case you want to try creating the effect using an action, I’ll quickly share a step-by-step explanation of how they work. (Note that I’ve already downloaded a cool watercolor action from Adobe.)
First, install the action. To do this, go to the Actions panel. Open the hamburger menu, and choose Load Action. Then, click on the action you downloaded; it should have an ATN file extension.
Once the action is loaded, you’ll find it listed in the Actions panel. If you’re using Adobe’s watercolor action, you’ll see it as a folder because it has two steps. However, if you’re using another action that only has one step, simply click Play and the watercolor effect will appear.
To use the Adobe action, open the folder and select the first step, called Setup. Click on the Play button to start:

Read the instructions and accept:

Select the subject as instructed. I’ll be using the Lasso tool, but feel free to use the tool of your choice. Then click on Watercolor Artist in the Actions panel and click Play:

And that’s it! Your image should now look like a watercolor. Note that the Adobe watercolor action leaves all the layers available for you in case you wish to make adjustments:

How to create a watercolor effect: final words
As you can see, applying a watercolor effect in Photoshop is not very difficult. You can use a filter, a handful of filters, or even an action – and once you’re done, all your favorite photos with look like gorgeous watercolor art.
You can also print the photos on watercolor paper and hang them around the house! So pick a few photos, then test out the watercolor effect. I bet you’ll like the results!
Now over to you:
Do you have any Photoshop tips for achieving amazing watercolor effects? Do you have any images using the technique that you’d like to share? Leave your thoughts in the comments below!
The post How to Create a Watercolor Effect in Photoshop (Step-By-Step Guide) appeared first on Digital Photography School. It was authored by Ana Mireles.