A Better Way to Refine Contrast for Photos with More Pop (VIDEO)

Lightroom’s Contrast slider is the most frequently used tool for editing images than can benefit from a boost in contrast but, unfortunately, this approach provides far less control than the other methods you’ll learn today by watching this tutorial from the popular PHLOG Photography YouTube channel.

Instructor Christian Mohrle has set his sights on being the best landscape photographer in Germany, even though he doesn’t make his living with a camera. In the video below he explains eight techniques for introducing more contrast that he greatly prefers to the limitations of Lightroom’s Contrast slider that you’ve be using until now.

Mohrle explains the process like this: “Instead, I use Tone sliders like Highlights, Shadows, Whites, Blacks, and even Exposure to more precisely target the tonal ranges you want to change.” His goal for the dramatic sample shot is to make the image even more impactful by bringing down exposure, improving Clarity and Dehaze, modifying midtone and color-range contrast, and improving color luminance contrast.

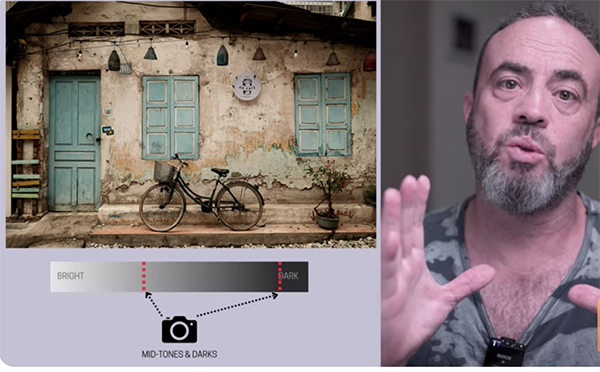
The 12-minute episode also explains an interesting technique for managing contrast through the use of split toning and reveals how a quick histogram trick contributes to the process. He begins by carefully bringing down the shadows without sacrificing important details in these portions of the frame.

The next step is increasing the highlights to significantly distinguish between the brighter and darker tones in the image. He also pushes the whites, taking care to avoid clipping, and illustrates how Lightroom will let you know when you’ve taken the highlight and shadow adjustments too far.

Mohrle’s histogram trick is super simple and helps you maintain control throughout the eight-step process, and he explains it like this: “Did you know that you can actually drag the histogram? If you want to make midtones a little brighter, for example, simply drag the histogram to the right.”

Lightroom will then automatically change the tonal sliders accordingly (whether you’re dragging the histogram to the left or to the right). As he says, this is important “because enhancing contrast is all about spreading the histogram” and he demonstrates why.

There’s much more to learn as the video proceeds, and Mohrle walks you through all the straightforward adjustments. Once the video concludes head over to his instructional YouTube channel that’s full of more post-processing tips and techniques.

And don’t miss a tutorial we featured recently with another Adobe expert who explains why it’s time for some belated spring cleaning if your Lightroom catalog is ” freaking disorganized mess.” Then he demonstrates how to clean it up once and for all.

Composition Tips that Take Photos From Average to Awesome (VIDEO)

Today’s quick tutorial from German pro Benjamin Jaworskyj explains what he considers to be the most effective composition techniques for inexperienced photographers, and he kicks off the lesson with this promise: “You’ll learn how use lines, balance, depth, and perspective to transform your images from average to awesome.”

Ben is a self-taught German photographer and educator who travels the world capturing compelling images with a unique, polished look. He also posts straightforward videos that share his experiences, technical tips, and rare mistakes to help other shooters elevate their skills with whatever gear they own.

This nine-minute tutorial builds on Ben’s previous installment of a two-part beginners guide to composition, and we recommend watching the introductory episode first if you’re absolutely new to our craft. Just visit his popular YouTube channel and scroll through the videos. The first session discussed the Rule of Thirds, explained the power of grids, where to set the horizon within the frame, and more.

Ben acknowledges the importance of camera settings and other technical matters, but he insists that thoughtful-and-precise framing is what enables you to showcase your creative vision. In fact, “a very slight change in vantage point can lead to a very different and more captivating composition.”

The trick involves what is basically a more advanced way to employ the familiar Rule of Thirds, in which the frame is divided by two vertical and two horizonal lines. But instead of concentrating on regions within the frame, this time it’s all about the “crossing points” identified by four yellow dots where the lines intersect in the center of the screen.

Ben put’s it like this: “I try to move myself and the camera position to where these crossing points occur.” He demonstrates the concept with a landscape scene that includes a prominent church in the background, and Ben begins by precisely positioning this key element atop the lower right crossing point.

Then he experiments by moving the church to the top right, top left, and bottom left crossing point to demonstrate the impact of each composition on the final result. Ben continues with more photos and other key considerations, and his claim is not that one approach is always better than the others, but rather that it’s up to you to determine the specific look you prefer depending upon the specific scene at hand.

There’s much more to learn about basic photography techniques on Ben’s popular YouTube channel so pay a visit and explore.

We also recommend watching an eye-opening a tutorial we featured with a professional travel photographer who shares his seven favorite techniques for capturing “authentic moments” of your journeys.

Is Your Lightroom Catalog a Freaking Mess? Fix It Like This (VIDEO)

It’s time for some belated spring cleaning if you waste time struggling with a disorganized Lightroom catalog that’s difficult navigate. If you’ve skipped this one-time housekeeping task because it requires a bit of thought and effort, think about all the frustration you’ll avoid by having all your images at your fingertips in logical folders where they’re easy to find.

Instructor Austin James Jackson says that “most photographers don’t have the best habits when organizing their catalogs and, unfortunately, this is one of the last things they consider when learning to use Lightroom.” His goal for today is to demonstrate how he increases efficiency and speed by doing things right.

We refer to this as a one-and-done process because once you’ve established a clean framework that works best for you, keeping track of future additions to the library will be a piece of cake. The lesson also discusses the implications of working with an external drive, and the benefits of converting image files to the standardized DNG format.

There’s also a few timesaving tricks for importing photographs to a new Lightroom catalog. The entire process is far easier to follow by listening to Jackson with his illustrations on the screen, so we’ll forgo our usual overview and let the expert demonstrate the best way to clean up your act.

Jackson’s instructional YouTube channel is full of shooting techniques for landscape photographers, along with  post-processing advice that’s appropriate for beginners and experienced Lightroom users alike.

And be sure to watch the tutorial we featured recently with another popular image-editing instructor who demonstrates how to use Lightroom’s Generative Fill capabilities to clean up his photographs and eliminate unwanted objects and other distracting artifacts.

Understanding Camera Drive Modes: Which One to Use When (VIDEO)

All cameras feature a selection of Drive Modes, whether your weapon of choice is a DSLR, mirrorless model, or a full-featured compact. Choosing the appropriate setting for the task at hand will simplify a shoot and increase your odds of success.

Instructor Benjamin Jaworskyj is a self-taught German photographer and adventurer whose basic tutorials take you behind the scenes as he demonstrates simple techniques that shooters of all skill levels can employ to elevate their skills. By the time this nine-minute episode concludes you’ll approach the topic with confidence and know when and how to use Single mode, one of the Burst settings, and even one of the two Self-Timer options.

Ben begins with the Single mode which is the setting most photographers use. Simply focus on your subject and capture the shot. This mode works well for landscapes, environmental portraits, and other situations when there’s no movement within the frame.

The Continuous mode, on the other hand, is a better choice when photographing subjects in motion, like birds in flight, wildlife on the ground, and a variety of fast-moving action-sports images. In this case the camera will typically offer of choice of three burst settings—Low, High, and High+. Keep in mind that the nomenclature varies from one camera to another.

Ben explains that when one of the Burst modes is selected, the camera will keep shooting at the chosen rate until you remove your finger from the shutter button or the camera empties its buffer. The speed of the buffering process depends upon the camera in use and whether you’re shooting Jpegs, Raw Files, or Jpeg and Raw.

Another consideration of note is the speed rating of your memory card, and this is super important when shooting at the highest burst rate or when making videos. There are a few other details to keep in mind—just follow Ben’s advice.

The video concludes with an overview of your camera’s Self-Timer settings, because these also fall under the category of drive modes. And there are usually two options: the two-second default and another with a 10-second delay.

Ben’s instructional YouTube channel is a great source of information, especially for beginning photographers who will benefit by learning the basics.

We also suggest watching another straightforward primer we featured recently that demystifies lens focal length and explains why there’s more to this concept than just magnification.

7 Transformational Travel Photo Tips from a Pro (VIDEO)

Travel photography is an interesting genre that borrows techniques from street photography and portraiture, along with best practices for capturing landscape and seascape imagery. Yet, we often do things a bit differently, because there’s the added goal of documenting a trip with memorable moments that tell a story.

Instructor Belinda Shi is an experienced shooter who’s traveled across six contents capturing over a million images in the past 18 years, so she has plenty of knowledge and great photos to share. She kicks today’s tutorial with this: “I’ll explain seven practical travel photography tips that will help you capture compelling stories and authentic moments during your travels.”

The discussion covers a wide-range of essential skills, like mastering different types of light for various purposes, the importance of imbuing your images with harmonious local colors, a thoughtful approach to composition, and the mindset needed for capturing long-lasting memories to share with family and friends.

She begins with harnessing the fundamentals of light, and why it’s necessary to take one approach when shooting environmental portrait, for example, and employing a different approach for urban landscape scenes and other types of photos. As she says, “it’s crucial to understand what kind of light works best for specific subjects.”

Shi then demonstrates how to deal with featureless skies that add nothing to the story you’re trying to tell. She puts it like this, “One composition mistake I constantly see is too much empty sky taking up too much valuable real estate within thee frame.” Her solution is to accentuate the key elements of your shot by minimizing flat, boring skies.

There’s also a discussion of gear, sensor size, and important camera settings, and one of Shi’s recommendations is to employ the camera’s burst mode both strategically and sparingly. She insists that high burst rates are rarely necessary for travel photography, and they’ll just fill up your memory card force you to spend time culling hundreds of similar images or even more.

The lesson proceeds with Shi’s tips for getting it right in the camera, and why she advises you to “capture a story not just faces.” There’s also a helpful discussion of how to put the important concept of color harmony to work. You can even join her masterclass for free with a link in the description beneath the video.

This is a lesson you won’t want to miss, especially if there’s a summer vacation on your itinerary. Once you’re done watching be sure to take a quick trip today by visiting Shi’s popular YouTube channel for photographers on the go.

And be sure to check out the earlier tutorial we shared in which an experienced pro explains “how to see light the way your camera does.”

Transform Your Blown-Out Photographs Into High-Key Masterpieces (VIDEO)

Overexposed images are the bane of outdoor photographers when shooting in complicated, mixed light, and even professional shooters like today’s instructor gets thing wrong on occasion. You’ll learn how to correct this common problem in the Lightroom tutorial below from the Photo Feaver YouTube channel.

James, namesake of the channel, is an accomplished British freelancer who shares twice weekly shooting and post-processing lessons designed to help beginners boost theirs skills. Here ‘s the point of the episode: “Just because you have an overexposed or blown-out photo doesn’t mean you can’t edit your way to a good image.”

In the next eight minutes James shares his Lightroom workflow for rehabilitating blown-out shots by applying a beautiful high-key effect. The first step in determining if and by how much your image is overexposed. James does this by opening Lightroom’s Clipping tool to reveal any pixels that are completely devoid of information.

Next you’ll want to open the Basic panel and “nudge the photo in the right direction.” Intuition may tell you that this is a simple matter of shifting a couple sliders to darken the image. To the contrary, James explains why the right approach for creating a bright and airy high-key look is to actually affect the shadows instead.”

To this end James boosts contrast and slightly increases exposure and drops the overpowering highlights. He then opens opens up the shadows and whites, while dropping the blacks in the increments he recommends. James also reveals the appropriate settings for Texture, Clarity and Dehaze, Vibrance, and Saturation.

The photo now looks better, but there’s still an issue with White Balance that needs to be corrected and James explains how to employ Lightroom’s Temperature slider to slightly warm up the shot.

Now it’s time to open Lightroom’s Tone Curve panel and create what’s known as a modified “S-Curve” that will brighten highlights and darken the shadows. As you’ll see, the more points you add to the curve the more of a targeted impact you can make.

At this point you’re barely halfway through the straightforward process, and James walks you through all the remaining steps. So follow his instructions and create a few high-key masterpieces of your own. Then pay a visit the Photo Feaver YouTube channel and check out all the other how-to videos at your disposal.

And don’t miss another helpful tutorial we featured recently with Feaver, demonstrating what he says are five hidden Lightroom tools that are essential for every photographer to understand.

How an Adobe Expert Uses Generative Fill to Clean Up His Photos (VIDEO)

We’ve all had the misfortune of capturing a seemingly great image, only to realize later that the shot includes a distracting element, or we failed to notice someone walking through the frame. At this point, unfortunately, it’s often impossible to go back for a redo.

There are several ways to remove unwanted clutter, some more complicated and less effective than others. Today’s tutorial from the PHLOG Photography YouTube channel demonstrates how to get the job done to perfection with a few quick clicks in Lightroom.

Instructor Christian Mohrle is a highly respected German photographer and post-processing expert who you’ll recognize if you’re a regular Shutterbug reader. His goal for today is to remove two people standing in front of a church in the middle of a beautiful landscape scene with snowcapped peaks looming in the distance.

Mohrle quickly banishes the bystanders and then demonstrates a straightforward workflow for significantly enhancing the shot by applying several basic adjustments, a bit of masking, color grading and sharpening. We therefore suggest downloading his sample Raw file from the link beneath the video so you can follow along and do everything yourself.

The first step is heading into Lightroom’s Remove tool panel that provides a number of options. Mohrle typically chooses the Healing Bruch do get rid of sensor spots and other small things, but his preference for more complex objects clicking on the Remove mode icon instead.

Once you’re in the Remove mode it’s important to select Generative AI “which will get rid of objects more easily.” Mohrle also activates Detect Objects. Then he chooses an appropriate brush size and paints roughly over the people to be eliminated. Mohrle notes that “it’s important to leave a little bit of room around an object, so there’s no need to be too precise.”

Then click on the Remove button on the right side of the workspace, and BOOM—after a brief wait the people are gone. Lightroom offers three different variations, so if you’re not satisfied with the first result try one or both of the others.

Mohrle now has a distraction-free image and it’s time to apply the global and selective enhancements mentioned above. It’s a reliable workflow that you can employ for processing a wide variety of outdoor images.

The popular PHLOG Photography YouTube channel is a great resource for everyone who shoots in the in the field.  We also suggest watching a tutorial we featured recently with another post-processing expert who demonstrates seven overlooked Lightroom tools that will speed up your Lightroom workflow and enhance every image you edit.

Lens Focal Length Demystified: There's More to it Than Magnification (VIDEO)

Focal length is one of the most essential concepts in photography, and a firm understanding of how it works is crucial when choosing the proper lens for a specific scene. Most photographers know that focal length determines the magnification of a subject within the frame, but there’s more to consider than this.

Today’s tutorial from the Hamed Photography YouTube channel will get you up to speed in barely four minutes so you’ll always reach for an appropriate lens based upon subject matter, prevailing light levels, and the specific mood or effect that you want to convey.

Hamed begins with a quick overview of the concept, explaining that “focal length is the distance (expressed in millimeters) between the optical center of a lens and the camera’s image sensor when the subject is in focus.” So it directly affects both angle of view (how much of a scene is captured), and magnification (how large individual elements will appear within the frame).

These considerations hold true whether you’re shooting with a prime lens or when selecting a specific focal on a zoom. As Hamed says, “a shorter focal length provides a wide angle of view and less magnification, while a longer focal gives a narrower angle of view with greater magnification.

But there’s still more to consider, which Hamed reveals by breaking down lenses into various categories. By his definition ultra-wide lenses range in focal length from 8-24mm and they’re often used for architecture, landscapes and interior photography. Their characteristics include strong perspective distortion—whereby the size of objects closer to the lens is exaggerated.

Conventional wide angle lenses (from 24-35mm), on the other hand, are ideal for street photography, travel, and environmental portraiture because they can capture a broad area

while maintaining a natural perspective. A standard 50mm lens in comparison has a field of view similar to what you see with your eyes and delivers a “balanced perspective” in which subjects appear natural and undistorted.

The discussion continues with a description of short telephotos (85-­135mm), medium to long telephotos (135mm–300mm) and the “big guns” with focal lengths of 300mm and more that wildlife photographers use to isolate subjects at a distance. In every case Hamed explains the benefits and drawbacks, appropriate applications, and the characteristics you can expect to see in your imagery.

There’s much more to learn about gear and shooting techniques on the Hamed Photography You Tube channel.

And speaking of lenses, but sure to watch the recent tutorial we featured with another accomplished pro who demonstrates how he captures attention-grabbing photographs by using a few affordable lens filters when shooting landscapes, nature scenes, and wildlife subjects.

Learn to See Light the Way Your Camera Does for Perfect Exposures (VIDEO)

One of the foremost photography challenges is learning how to properly evaluate the light in a scene and arrive at a perfectly balanced exposure. If you find this a struggle, the tutorial below from pro Gil Kreslavsky explains everything you need to know in the next 11 minutes.

Gil is an experienced Israeli photographer and educator who specializes in travel, street and documentary imagery, with a popular YouTube that shares his experiences, gear preferences, practical insights, and real-world tips. He introduces the video like this: “You’ll learn how to understand light the way your camera does, master dynamic range, and avoid guessing about your settings.”

By the time the lesson concludes you’ll approach exposure with confidence, master dynamic range, and know how to control bright highlights and deep shadows. With this knowledge in hand, the creative decisions you make will strengthen every image you shoot in challenging situations.

Gil’s advice is based on the fact that our eyes and the camera see light in very different ways. His analogy is to imagine that you’re standing indoors, looking out through a window. “The human eye can easily observe what’s happening indoors and out, but a camera can only accurately deal with one of these very different light intensities.”

Thus, if you meter for the dim room, everything beyond the window will be blown out and devoid of detail. Conversely, the indoor scene will be dark and unreadable if you expose for what’s outside. This is because “our sensitive eyes can discern approximately 24 stops of light tonality, while modern cameras are limited to capturing a range of 13-15 stops.”

What all this means in the field is that there may be a big chunk of dynamic range that a camera simply cannot record. Now that you understand these theoretical considerations, the practical techniques that follow make perfect sense, and they’re very easy to implement if you follow Gil’s straightforward advice.

Gil explains the compromises required to balance light in various scenarios and conditions for an ideal range of tones. Sometimes appropriate camera settings will get the job done, while other times the solution is limiting dynamic range or changing your vantage point and framing a scene differently.

In short, you can eliminate guesswork and consistently nail exposure by employing Gil’s tips and techniques. Be sure to explore his instructional YouTube channel once the video concludes.

We also recommend watching an earlier tutorial we featured with another accomplished outdoor shooter who provides a quick-and-easy beginners guide for harnessing the power of backlighting to capture nature, wildlife, and landscape photographs that demand everyone’s attention.

10 Powerful Photoshop Improvements You May Have Missed (VIDEO)

Whenever Photoshop gets an update it’s easy to concentrate on headline-grabbing features while overlooking other new and important capabilities that aren’t considered as “revolutionary” but important nonetheless. Today’s eye-opening tutorial from Adobe expert Julieanne Kost reveals 10 recent upgrades that are deserving of note.

Kost is a highly respected photographer, educator, and an expert at all things Adobe whose popular YouTube channel has 55K subscribers who appreciate her how-to videos that have received over 4M views. There’s a very good chance that the tutorial below will change your post-processing workflow forever more.

Be prepared to take a few notes because Kost covers a lot of ground in nine minutes as she runs through her list of oft-ignored features that includes everything from tricks with Photoshop’s Gradient tool, fonts and type, Generative Fill, the Adjustment Brush, and more.

She begins with Photoshop’s familiar Select Subject and Remove Background capabilities and demonstrates how much they’ve evolved when image processing is set to Cloud. As she says, “With the improved processing expect to see improvements to subject detection, masking of fine details, edge selection, and the selection of holes within an object.”

Next on the list is a unique way to create gradients by choosing the Stripes option found in the Method dropdown menu. This approach is super helpful when your goal is to achieve interesting effects with abrupt transitions between colors.

Tip #3 has to do with the fact that more that 1,500 new fonts have been added to Adobe’s Type library, “including many of the most popular fonts of all time from monotype, such as Helvetica, Gotham, and Avenir. Another noteworthy upgrade is that Photoshop’s Frame tool now supports custom shapes. There are a variety of presets, but you can also use the Shape panel’s fly-out menu to load additional legacy shapes or even create custom shapes of your own.

We’ve barely scratched the surface of everything you’ll learn about the new Photoshop enhancements you may have missed, along with helpful advice for putting them to work. Once you’re done be sure to visit Kost’s instructional YouTube channel where you’ll find many more transformative methods for making the most of Adobe’s image-editing software.

And don’t feel ignored if you’re a Lightroom user because we recently featured a tutorial from another post-processing export who demonstrates his seven favorite hidden Lightroom tools that you should start using today whether you’re a beginner or more experienced photographer.